
Static website distribution with AWS CloudFront
Having only written about PHP and Servers in the past I am making the switch to Serverless. This has been a long-time wish for me and finally realized this in a personal but also professional environment. That being said, I plan on writing a lot of new content on the blog purely around setting up applications with a serverless mindset, built with AWS CDK (AWS Cloud Development Kit). I will include diagrams and/or flowcharts to explain what is happening and of course, include the source code in a public GitHub repository.
The bigger goal for me is to develop a proper application on nothing but serverless services from Amazon to train my skillset and also share the process that I went through.
Before we get started
First things first, the way I’m making my content won’t be a step-by-step guide. At this point, I assume you are at least familiar with Amazon Web Services, Infrastructure as Code and read up at least a little about the Cloud Development Kit.
At this moment you should already have the following tools installed:
- Node/NPM
- Typescript
- AWS CDK
What are we building?
The easiest project to experiment with serverless on AWS is with a basic static website. Let’s say you only have some HTML/JS/CSS files, we can easily host the website with Amazon S3 + Amazon CloudFront. That means we have a storage provider where we can store our files and a service that helps us serve the files to the visitors. As a bonus, CloudFront serves as a Content Delivery Network which means the files are cached over multiple regions in the world if necessary.
For this particular example, I’ve chosen not to use a custom domain for the CloudFront distribution. Because at the moment, I don’t have a hosted zone setup within AWS and it doesn’t really add value at this point.
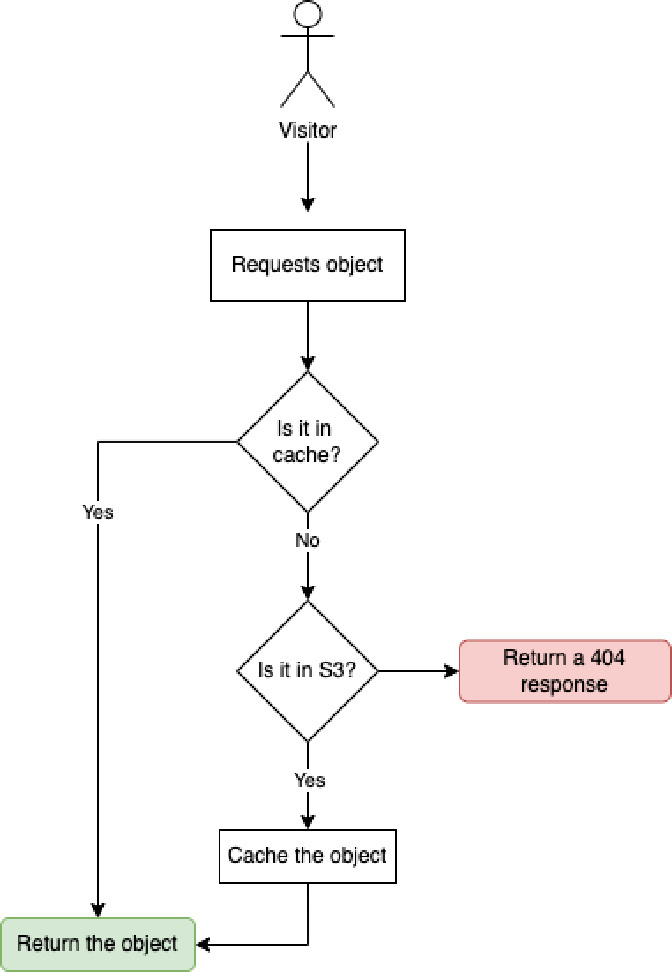
How this would work from a user perspective is quite simple, whenever the user requests an object it would first check if it exists in the cache. When it does, it is as returning the cached file. When it is not in the cache, that’s when CloudFront checks if it exists in the origin (S3 in our case) and acts depending on if it is found or not.
Infrastructure as Code
As a best practice, you should use infrastructure as code as much as possible. As said earlier my preferred tool at the moment would be the AWS CDK and this is what I’ll show today on how I’ve set this up. I’ll be going over the main stack I’ve created in CDK which can be found here for those who like to read along.
To start we need to create an S3 Bucket where all our files will be stored. In the example, we will just be storing an index.html and a favicon.ico. As you can see below, we kept it really simple.
const bucket = new s3.Bucket(this, 'StaticWebsiteBucket', {
  bucketName: Stack.of(this).account + '-static-website-test',
  websiteIndexDocument: 'index.html',
  publicReadAccess: false,
  blockPublicAccess: s3.BlockPublicAccess.BLOCK_ALL,
});
The only notable comment here is that we disable public access to the bucket which is an actual best practice. Every time you create a bucket: make it private. If you do need it to be public, really ask yourself if it’s necessary. In our current situation, all our files are publicly accessible but only when visiting from our CloudFront distribution.
After we’ve created our S3 Bucket we are going to allow access with an Origin Access Identity where we are basically going to allow CloudFront to access all our files in the S3 Bucket but only on the s3:GetObject action. Just retrieving the files and nothing else.
const cloudfrontOAI = new cloudfront.OriginAccessIdentity(this, 'cloudfront-OAI', {
  comment: `OAI for ${id}`
});

bucket.addToResourcePolicy(new iam.PolicyStatement({
  actions: ['s3:GetObject'],
  resources: [bucket.arnForObjects('*')],
  principals: [new  iam.CanonicalUserPrincipal(cloudfrontOAI.cloudFrontOriginAccessIdentityS3CanonicalUserId)]
}));
Now the bucket is completely ready we can create the CloudFront distribution where we will use this bucket as an origin source and configure the origin access identity to ensure everybody is up to date on what is allowed.
const distribution = new cloudfront.CloudFrontWebDistribution(this, 'StaticWebsiteDistribution', {
  originConfigs: [
    {
      s3OriginSource: {
        s3BucketSource: bucket,
        originAccessIdentity: cloudfrontOAI
      },
      behaviors: [
        {
          isDefaultBehavior: true,
          compress: true,
          allowedMethods: cloudfront.CloudFrontAllowedMethods.GET_HEAD_OPTIONS
        }
      ]
    }
  ]
});
While all the services are now in place within AWS there is only one part missing, how do we get our files in the s3 bucket? This is something that I thought was annoying to deal with but I was completely wrong! In the AWS CDK, there is this beautiful library called aws-s3-deployment which can automate the deployment from the CDK template.
new s3deploy.BucketDeployment(this, 'DeployWithInvalidation', {
  sources: [s3deploy.Source.asset('./static')],
  destinationBucket: bucket,
  distribution,
  distributionPaths: ['/*'],
});
Here you’ll see all the pieces coming together. We are deploying our files from the static folder to our specified bucket and because we are mentioning our CloudFront distribution the deployment will automatically take care of invalidating the caching of these files.
Interesting learnings
A couple of things that I found really interesting is that while using Amazon CloudFront the most important statistic is of course your cache hit/miss ratio. When the percentage of misses is too high there is probably something wrong with your setup. However, in my initial deployment, I had a lot of errors in the CloudFront console. The reason behind it was that I was missing a favicon.ico in the static website. This was a logical result of requesting the website from the browser, on every request the browser would try to retrieve the favicon to display in the tab bar. Just for that statistic alone, my advice would be, just add a favicon to the website and never think about it again.
Closing note
This is the easiest way to get started with a serverless website. It’s fairly simple to set up but covers the basics of what you need to know and how to progress in the world of serverless. However, this is by far not the production-ready state you want to run your application. For starters, you should use your own domain instead of the *.cloudfront.net endpoint and that would give you some extra work with configuring Route53 + SSL Certificate (in combination with CloudFront of course).
Besides that, at the current source code, it is necessary to deploy every change yourself. This is not something you want, it would be much nicer to have this in an automated pipeline in for example AWS CodePipeline or my preferred way of deploying which is with GitHub Actions.
In the next post, I’ll be talking about how to set up your GitHub repository to deploy on every update!
Github: https://github.com/cino/cdk-static-serverless/tree/initial-static-website